
One Tenant Record, One Background Job, a Fully Configured SaaS Site
How I automated multi-tenant site provisioning with Frappe Framework
Full-stack engineer who loves JavaScript a bit too much. I build with React, Next.js, and Nest.js. When I’m not coding, I’m usually watching anime, reading, or enjoying a drink like any developer trying to decompress after a long day.
If you're not already working with Frappe Framework, this article probably isn't for you, and that's fine. But if you are, you know the drill.
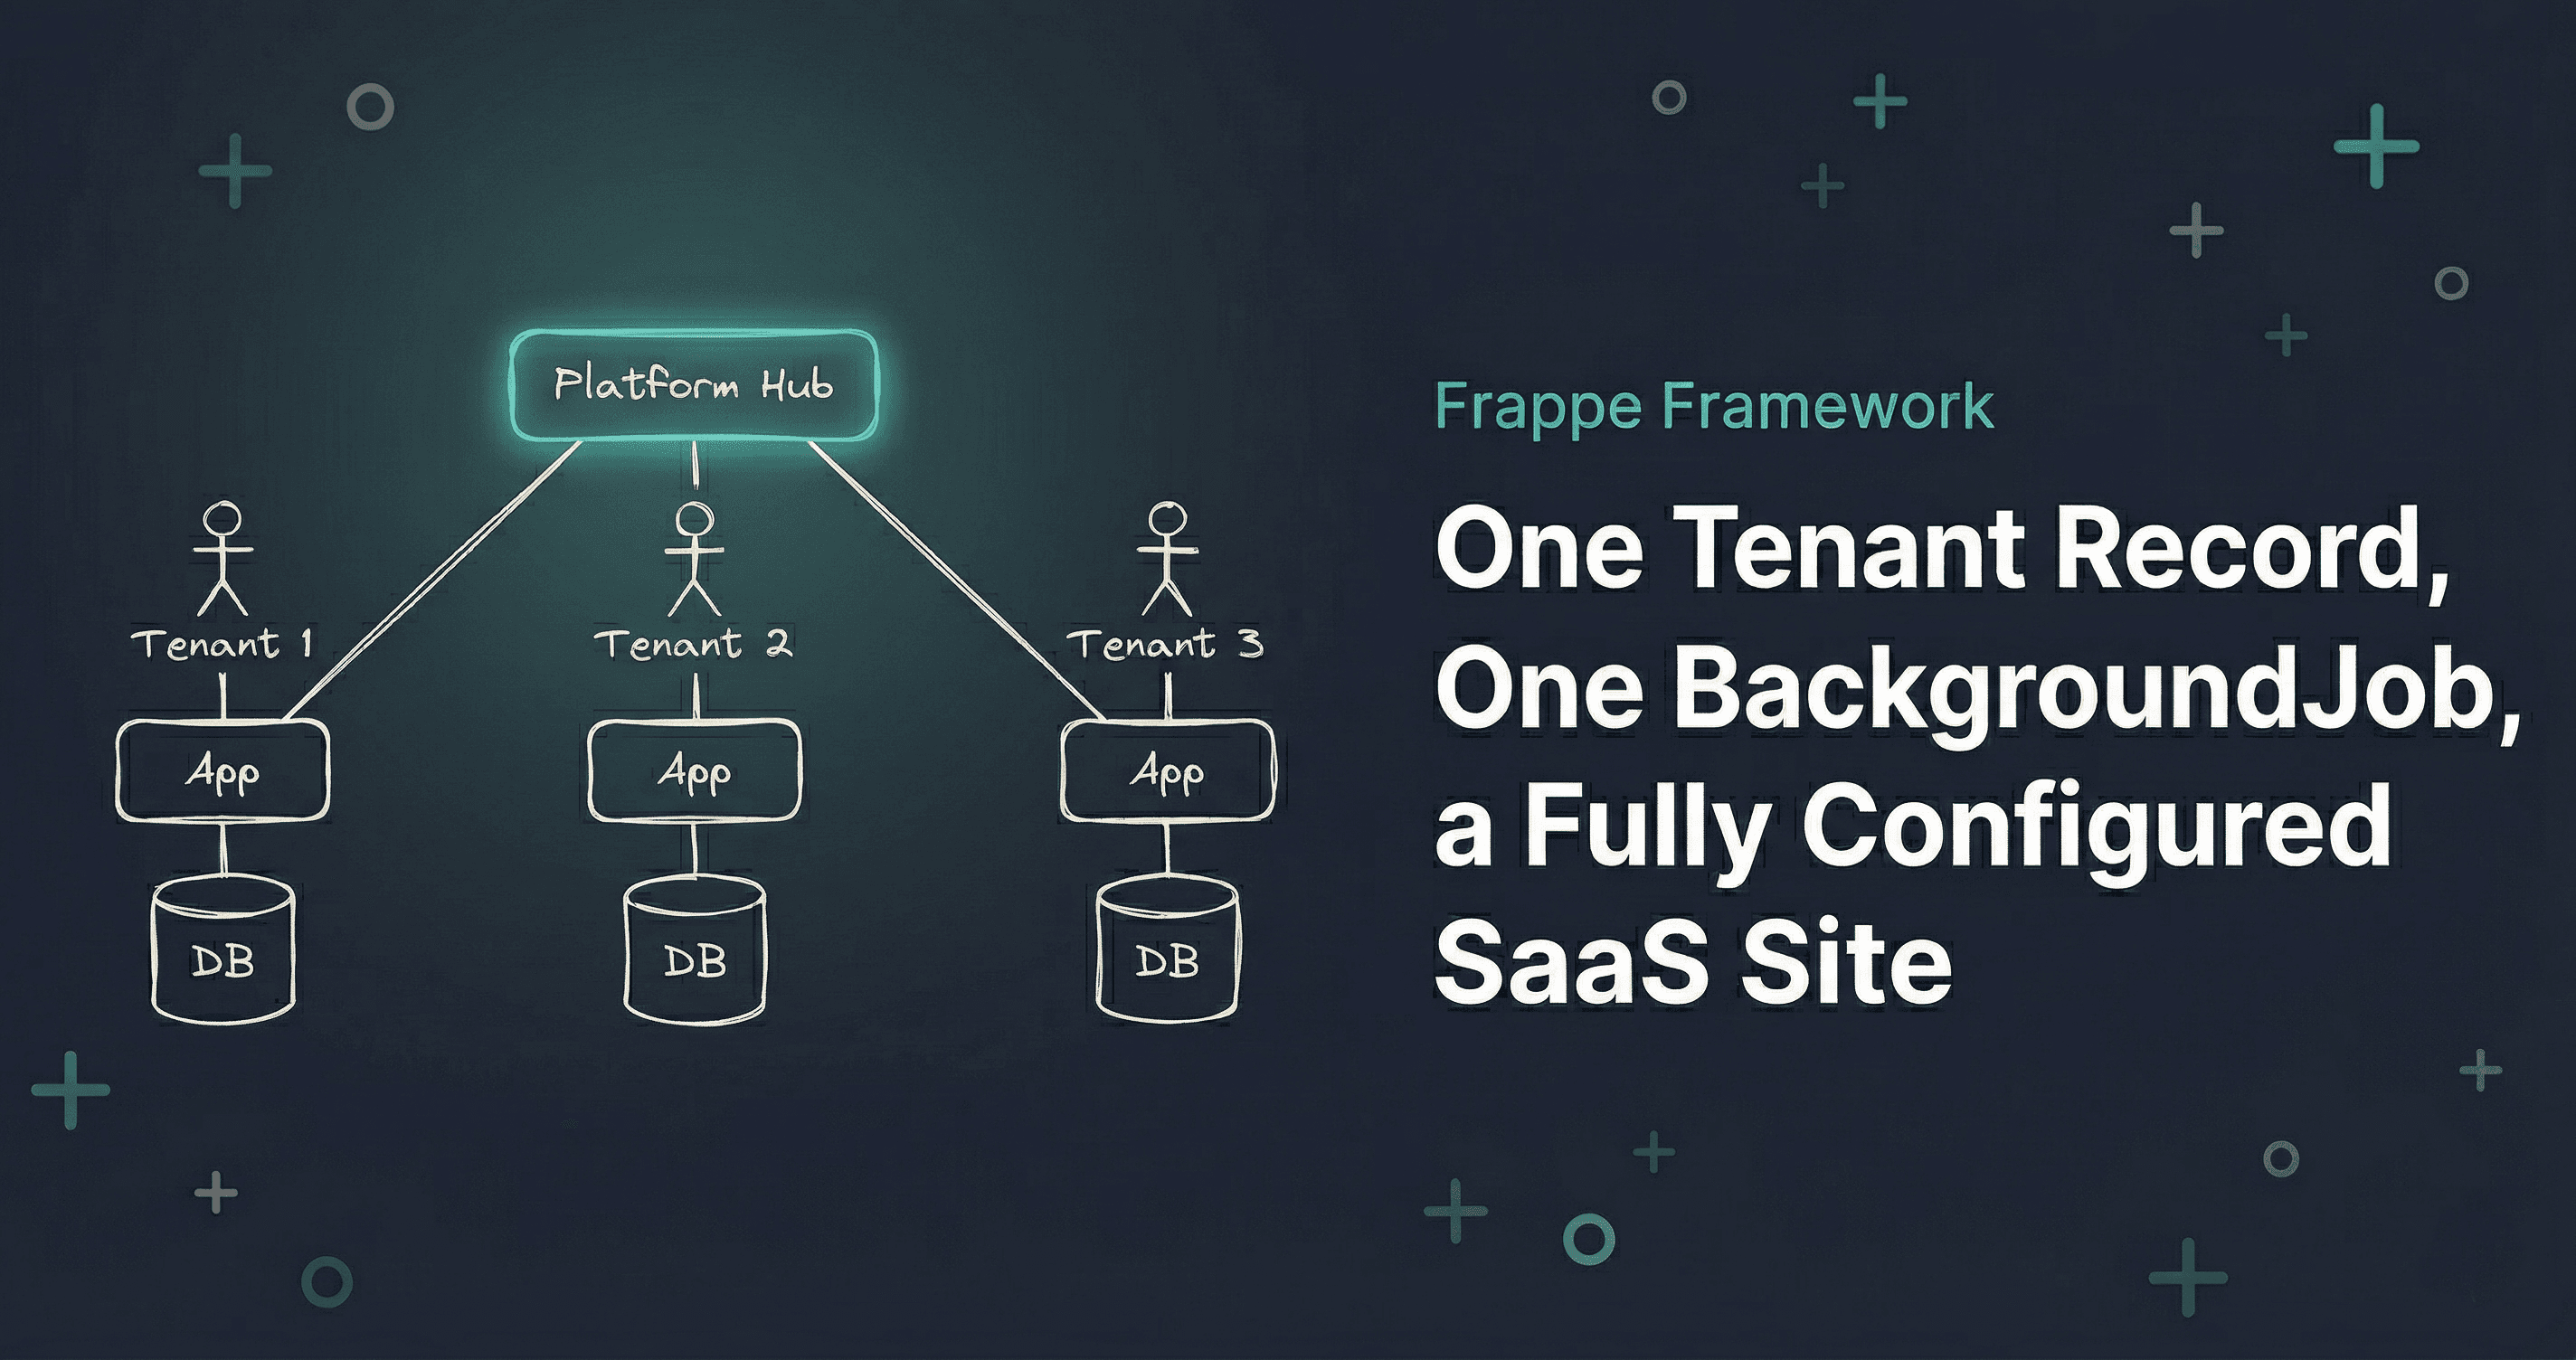
I was working on a Frappe project where we were building a multi-tenant SaaS platform. The architecture is straightforward: one central Platform app manages tenants, each tenant gets their own dedicated Frappe site with its own database. Complete data isolation, no row-level filtering gymnastics. Clean.
The problem was everything that happened before a tenant could actually use their site. Nothing like manually running around half a dozen bench commands, creating API users, copying credentials into a spreadsheet, and then realizing you typo'd the site name on step three. That was my reality every time a new tenant needed onboarding. Every. Single. Time.
Here's what that checklist looked like:
# Step 1: Create the site
bench new-site tenant-name.localhost --admin-password secret --mariadb-root-password root

# Step 2: Enable developer mode (needed for fixtures)
bench --site tenant-name.localhost set-config developer_mode 1

# Step 3: Install shared library
bench --site tenant-name.localhost install-app shared_lib

# Step 4: Install the tenant app
bench --site tenant-name.localhost install-app tenant_ops

# Step 5: Create an API user for system-to-system communication
bench --site tenant-name.localhost add-system-manager api@example.com --first-name Platform --last-name API

# Step 6: Generate API keys
bench --site tenant-name.localhost execute frappe.core.doctype.user.user.generate_keys --args "['api@example.com']"

# Step 7: Copy the output, paste credentials into Platform... somewhere
Seven steps. Every single time. And if you miss the developer mode step before installing apps, the fixtures don't load and you get to debug that for 20 minutes before realizing what happened.
I decided to automate the whole thing.
The Architecture: One Site Per Tenant
Before getting into the provisioning, a quick note on why the architecture works this way.
Each tenant gets a completely isolated Frappe site: its own database, its own configuration, its own user pool. The Platform hub doesn't store any tenant operational data. It just knows about tenants: their name, their site URL, their status, and the API credentials to talk to them.
Think of it like an apartment building. The management office (Platform) keeps a directory of tenants and handles onboarding. But each apartment (tenant site) has its own lock, its own utilities, and its own stuff inside. The management office doesn't keep a copy of your furniture.
This model gives you real data isolation without any row-level filtering gymnastics. The trade-off is that provisioning a new tenant means creating an actual Frappe site, not just inserting a row. That's why automation matters here.
The Trigger: A Lifecycle Hook
Frappe has lifecycle hooks on every document (DocType). after_insert() fires right after a new record is saved to the database. That's the perfect trigger point.
When someone creates a new Tenant record on the Platform, the hook checks a configuration flag and, if auto-provisioning is enabled, kicks off a background job.
class Tenant(Document):
    def after_insert(self):
        """Enqueue site provisioning after tenant creation (if enabled)."""
        if not frappe.conf.get("auto_provision_tenant_sites", False):
            return  # Manual mode

        frappe.enqueue(
            "platform_hub.jobs.tenant_provisioning_jobs.provision_tenant_site",
            tenant_name=self.name,
            queue="long",
        )
        frappe.msgprint(
            f"Site provisioning started for '{self.tenant_name}'. You'll be notified when complete.",
            indicator="blue",
            alert=True,
        )
A few things I like about this approach:
It's opt-in. The auto_provision_tenant_sites flag lives in common_site_config.json. Set it to false (or don't set it at all), and you're back to manual mode. No code changes needed.
It's non-blocking. frappe.enqueue() pushes the work to a background queue. The user sees a blue notification and can keep working. Site creation takes a minute or two, and you don't want that blocking the request.
It's the "long" queue. Frappe has multiple job queues: default, short, long. Since provisioning runs subprocess commands that can take up to 5 minutes, it belongs in the long queue where timeouts are more generous.
The config is straightforward: three keys in common_site_config.json:
{
  "auto_provision_tenant_sites": true,
  "provision_mariadb_root_password": "your-root-password",
  "provision_admin_password": "initial-admin-password"
}
The Provisioning Service: Seven Steps, One Method Call
The core logic lives in a service class. I like keeping it separate from the DocType controller and the job handler. Each layer has one job.
The orchestration is dead simple:
class TenantProvisioningService:
    def __init__(self, tenant_name: str):
        self._tenant_name = tenant_name
        self._bench_path = get_bench_path()

        # Load config
        self._mariadb_root_password = frappe.conf.get("provision_mariadb_root_password", "")
        self._admin_password = frappe.conf.get("provision_admin_password", "")
        self._api_user = "api@example.com"

        if not self._mariadb_root_password or not self._admin_password:
            frappe.throw(
                "Missing provisioning config. Please set provision_mariadb_root_password "
                "and provision_admin_password in common_site_config.json"
            )

        # Parse site hostname from Tenant's URL
        tenant = frappe.get_doc("Tenant", tenant_name)
        parsed = urlparse(tenant.site_url)
        self._site_name = parsed.hostname

    def provision(self) -> None:
        self._create_site()
        self._enable_dev_mode()
        self._install_app("shared_lib")
        self._install_app("tenant_ops")
        self._create_api_user()
        credentials = self._generate_api_keys()
        self._update_tenant(credentials)
        self._notify_user()
Seven steps. In order. No parallelism needed because each step depends on the previous one. You can't install an app on a site that doesn't exist yet.
Running Bench Commands from Python
Here's where it gets interesting. I'm running bench CLI commands via subprocess, not through Frappe's internal Python APIs.
def _run_command(self, args: list[str], timeout: int = 300) -> subprocess.CompletedProcess:
    result = subprocess.run(
        args,
        capture_output=True,
        cwd=self._bench_path,
        timeout=timeout,
    )

    if result.returncode != 0:
        stdout = result.stdout.decode() if result.stdout else ""
        stderr = result.stderr.decode() if result.stderr else ""
        raise Exception(
            f"Command failed: {' '.join(args)}\n"
            f"Exit code: {result.returncode}\n"
            f"Stdout: {stdout}\n"
            f"Stderr: {stderr}"
        )

    return result
Why subprocess instead of calling Frappe's Python functions directly? Because bench new-site does a lot of heavy lifting: creating a database, setting up the site directory, running initial migrations, installing the core Frappe app. These operations are designed to run as CLI commands, and trying to replicate all of that through internal APIs would be fragile and unnecessary. The CLI is the stable interface here.
The 300-second timeout is generous but necessary. App installation can take a while depending on how many fixtures and migrations need to run.
Each provisioning step is just a thin wrapper around _run_command:
def _create_site(self) -> None:
    self._run_command([
        "bench", "new-site", self._site_name,
        "--admin-password", self._admin_password,
        "--mariadb-root-password", self._mariadb_root_password,
    ])

def _install_app(self, app_name: str) -> None:
    self._run_command([
        "bench", "--site", self._site_name,
        "install-app", app_name,
    ])

def _enable_dev_mode(self) -> None:
    self._run_command([
        "bench", "--site", self._site_name,
        "set-config", "developer_mode", "1",
    ])
The Tricky Part: Parsing API Credentials
Generating API keys is straightforward. Parsing the output? That's where things get a bit creative.
Frappe's generate_keys function prints a Python dict to stdout. Not JSON. A Python dict. So I parse it with ast.literal_eval, which safely evaluates Python literals without executing arbitrary code.
def _generate_api_keys(self) -> dict[str, str]:
    result = self._run_command([
        "bench", "--site", self._site_name,
        "execute", "frappe.core.doctype.user.user.generate_keys",
        "--args", f"['{self._api_user}']",
    ])

    stdout = result.stdout.decode().strip()

    # Parse the dict from output, find the line containing api_key
    for line in stdout.split("\n"):
        line = line.strip()
        if line.startswith("{") and "api_key" in line:
            return ast.literal_eval(line)

    raise Exception(f"Could not parse API credentials from output: {stdout}")
Not the prettiest code I've ever written, but it works reliably. The output format hasn't changed across Frappe versions, and ast.literal_eval is safe: it only parses literals, so no code injection risk.
Storing Credentials and Activating the Tenant
Once we have the API keys, we update the Tenant record and flip its status to Active:
def _update_tenant(self, credentials: dict[str, str]) -> None:
    tenant = frappe.get_doc("Tenant", self._tenant_name)
    tenant.api_key = credentials["api_key"]
    tenant.api_secret = credentials["api_secret"]
    tenant.status = "Active"
    tenant.save()
    frappe.db.commit()

def _notify_user(self) -> None:
    frappe.publish_realtime(
        "msgprint",
        {
            "message": f"Tenant site '{self._site_name}' provisioned successfully!",
            "indicator": "green",
        },
    )
The api_secret field is a Frappe Password type, so it gets encrypted at rest automatically. No extra work needed. And publish_realtime sends a browser notification to whoever created the Tenant, so they know it's done without refreshing the page.
One thing you might notice: I'm calling frappe.db.commit() explicitly here. Normally you don't need to in Frappe because it auto-commits at the end of a request. But this runs inside a background job, not a web request. If the job crashes after save() but before the implicit commit, you'd lose the credentials. The explicit commit makes sure that doesn't happen.
Making It Safe: Idempotency and Error Handling
The background job handler is intentionally thin. Its only responsibilities are the idempotency guard and error logging:
def provision_tenant_site(tenant_name: str) -> None:
    # Guard: Skip if already provisioned
    api_key = frappe.db.get_value("Tenant", tenant_name, "api_key")
    if api_key:
        return

    try:
        service = TenantProvisioningService(tenant_name)
        service.provision()
    except Exception as e:
        frappe.log_error(
            message=str(e),
            title=f"Tenant Provisioning Failed: {tenant_name}",
        )
        raise  # Mark job as failed in RQ
The idempotency guard is simple but important. If api_key already exists on the Tenant, the site was already provisioned. Skip. This prevents duplicate sites if someone retries a job manually, or if the queue somehow dispatches it twice.
The error handling follows a clear pattern. Log the error to Frappe's Error Log DocType (which gives you full stack traces and context in the admin UI), then re-raise the exception. Re-raising is critical: it tells Frappe's job queue (built on Python RQ) that the job failed, so it can retry with exponential backoff.
I considered adding more granular error recovery, like rolling back a half-created site if app installation fails. But let's be honest, for a dev/staging provisioning workflow, the simpler approach works fine. If something fails, you check the Error Log, fix the issue, and the retry usually handles it. No need to over-engineer.
What Happens After: Bidirectional Sync
Provisioning is just the setup. Once the Tenant is Active, the real work begins: the Platform and tenant sites need to stay in sync with each other.
The credentials we stored during provisioning are exactly what makes this possible. The Platform has a dedicated HTTP client that reads the api_key and api_secret from the Tenant record and calls whitelisted API endpoints on the tenant site. The tenant site has its own HTTP client that reads Platform credentials from the bench config and pushes updates back the other way. Both directions are async: background jobs, not inline calls.
The interesting part is preventing sync loops. If Platform pushes a change to the tenant, and the tenant's on_update hook immediately pushes it back, you've got an infinite loop. The solution is clean but not obvious, and there's enough going on with the typed exception hierarchy, the remote_name linking pattern, and the flag-based loop prevention that it deserves its own write-up.
I'm planning a follow-up post that covers the full bidirectional sync implementation. If that's what you came here for, stay tuned.
What This Setup Is and Isn't
Let me be honest about where this approach works and where it doesn't.
This works well when:
- You're running a controlled number of tenants (development, staging, or small-scale production)
- All tenant sites live on the same bench (same server or VM)
- You need real data isolation without the complexity of schema-per-tenant in a shared database
- Your provisioning volume is low-to-moderate (you're not onboarding 100 tenants per hour)
What it's not built for:
- Distributed provisioning. Since we're running
benchCLI commands via subprocess, the Platform site and the new tenant site need to be on the same machine. If you need to provision on remote servers, you'd need to swap subprocess for SSH commands or a provisioning API on each server. That's a whole different beast. - DNS automation. The provisioned site gets a
.localhosthostname that needs an/etc/hostsentry. In production, you'd want automated DNS configuration (Route 53, Cloudflare API, etc.). That's not included here. - Container orchestration. If you're running tenants as separate containers, you'd need Docker API calls instead of bench commands. Same pattern, different execution layer.
The pattern itself transfers to any of those scenarios: lifecycle hook triggers background job, service class runs sequential provisioning steps, credentials get stored back on the source record. The implementation details change, but the architecture stays the same.
What I'd Do Differently Next Time
If I were starting from scratch, I'd add a provisioning_status field on the Tenant record, something like Queued, In Progress, Completed, Failed. Right now the only signals are: does api_key exist (provisioned) or not (pending/failed). That works, but a dedicated status field would make the admin UI much clearer.
I'd also consider generating a unique API user per tenant instead of using a shared system user. Right now all tenant sites use the same API email address. It works, but per-tenant credentials would make it easier to revoke access for a single tenant without affecting others.
So yeah, that's the setup. One Tenant record, one background job, and you've got a fully configured SaaS site with API credentials, ready for bidirectional sync. The whole flow takes about 90 seconds end to end, and the admin doesn't have to touch the terminal.
If there's interest, I might write a follow-up about the bidirectional sync in more detail, you know, field mapping strategies, error recovery, and what happens when one side is down while the other keeps pushing updates. Because that's where multi-tenant architectures get really interesting 🚀